Monday, May 24, 2010

Other Interesting stuff


TBC


Lots of 3d video examples. Consist of very basic to extremely well constructed.

Sunday, May 23, 2010

NURBS Modeling


NURBS (Non-Uniformal Rational B-splines).

Lesson 1: Revolving a curve to create a surface.


In this lesson you learn how to:
■ Create a NURBS curve using the control vertices (CV) creation technique.
■ Use the grid for visual reference when modeling.
■ Determine the start and end points for a NURBS curve and its direction.
■ Create a revolved NURBS surface using the Revolve tool.
■ Change the display shading smoothness for a NURBS surface.
■ Edit a NURBS surface by editing its initial profile curve when it is linked
to the surface by construction history.


Lesson 2: Sculpting a NURBS surface.

In this lesson you learn:
■ Basic sculpting operations (push, pull, smooth, relax and erase) with the
Sculpt Geometry Tool.
■ How the density of isoparametric lines affects the surface detail possible
when sculpting.
■ How to increase the surface subdivisions on a NURBS surface to aid with
surface sculpting.
■ How to change the brush radius for the Sculpt Geometry Tool.
■ How Opacity and Max Displacement affect the sculpting operations.
■ How to import geometry from a pre-existing file into your current scene.

*Egg cup imported to scene


Lesson 3: Lofting curves to create a surface.


In this lesson you learn how to:
■ Modify the outline of a circle primitive by editing the position of its CVs.
■ Use the magnet snap feature.
■ Loft cross section curves to create a NURBS surface using the Loft tool.
■ Edit the form of an existing primitive object by moving its CVs.
■ Parent one object to another using the Outliner.


Tuesday, April 27, 2010

Getting Started with Maya Tutorials:


Introduction

Lesson 1: Maya Interface (already been through with the Maya built in tutorial).

Lesson 2: Creating, Manipulating and viewing objects.

In this lesson, you learn how to:
■ Create 3D primitive objects.
■ Select objects for manipulation and editing purposes.
■ Move and rotate objects using your mouse.
■ Move, rotate, and scale objects using numeric input.
■ Duplicate objects.
■ Change the viewing panels in Maya using a variety of methods so you can
view your objects from different points of view.
■ Undo actions when you need to undo a particular task or step.


Lesson 3: Viewing the Maya 3D scene.

In this lesson you learn how to:
■ Understand the difference between moving objects in the scene and moving
the point of view on the scene.
■ Use the dolly, track, and tumble camera tools to change the view of your
scene in both the orthographic and perspective views.
■ Rotate objects using the transformation tools in the Toolbox.
■ Select objects using a variety of techniques.
■ Group objects together so they can be transformed as a unit.
■ Display objects in both wireframe and shaded modes.
■ Use additional primitive objects and options.

Lesson 4: Components and Attributes.

In this lesson you learn how to:
■ Template objects in the scene.
■ Understand the difference between objects and components.
■ Edit objects at their component level.
■ Assign surface material attributes
■ Access the Attribute editor


Polygon Modeling

Lesson 1: Modelling a polygon mesh.

In this lesson you’ll be introduced to some of the polygon modeling tools
Maya provides by learning how to:
■ Use 2D image planes as a reference for constructing 3D models
■ Use 3D primitives as the basis for creating more complex models
■ Work with the components of a polygon mesh (faces, edges, and vertices)
■ Smooth a polygon mesh
■ Select the faces, edges, and vertices of polygonal meshes
■ Create polygon faces by placing vertices
■ Scale and extrude faces on a polygon mesh
■ Move and rotate extruded polygonal meshes
■ Split vertices and subdivide polygonal faces
■ Combine separate meshes into one mesh
■ Bridge between meshes
■ Add faces to an existing mesh
■ Use Snap to Grid
■ Preview a smoothed high resolution version of a polygon mesh
■ Harden and soften polygon edges

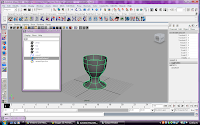
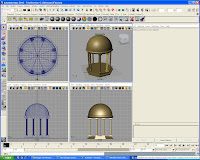
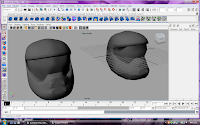
Beginning to create the outer shell:

The final render:
The helmet on the left is the final render. The one to the right was its original outline. These two were linked which ment if i edited the right one to make more define edges, the left one would change appropriately and allow for a more smoother render.


Lesson 2: Sculpting a polygon mesh.

In this lesson you’ll be introduced to some of the polygon modeling options
Maya provides by learning how to:
■ Use reflection to perform symmetrical transformations to your model
■ Use Soft Select to transform components with falloff
■ Modify the falloff area and shape
■ Create a custom falloff shape
■ Select components using Marquee select and Drag select
■ Use Camera based selection to limit the components you select
■ Use the Split Edge Tool to separate edge rings

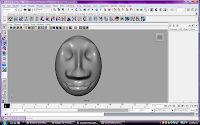
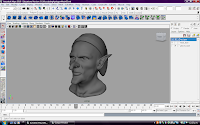
This was a tutorial that supplied the model of a head. The tasks were then designed to turn it into a Goblin.

I have a few software issues with this task. Several times when trying to use the soft modification tool, maya would completely shut down.


Tuesday, March 9, 2010

Some mucking in maya...

What better way to learn than trial and error. The following example is from sculpting a polygon sphere. I have slowly morphed sections of it to appear to look like the outline of a face. This has very little detail other than its structure, but I now have a better understanding of the sculpt geometry tool and the soft modification tool.


Basic head shape:


Editing using the sculpt geometry tool:


Editing using the soft modification tool:


Some of the short cut keys for these tools are similar to photoshop which made it esaier to understand. For exmaple, when using the scultp geometry tool, togling between holding "Ctrl" and clicking would change which way the sculpture was being modified, either inwards or outwards.


Click on images to enlarge...

Wednesday, March 3, 2010

Some research books...

One of the BIT lecturers, Patricia, lent me some books about 3D animation including a maya book "the art of maya".

I will use some of these to help understand how to create and develop 3D objects and characters.
These books are:

  • the art of maya. Alias wavefront.
  • Game Character Development with Maya. by Antony Ward. New Riders.
  • Learning Maya 6. Fountation. Another Alias product.
  • 3D Creature Workshop. By Bill Fleming.
They are a little dated but still help explain the basic functionality and terminology for maya.

Monday, March 1, 2010

Research ideas about a project..

After looking through a book and DVD set from Su (Pictoplasma maybe??), I found some interesting styles that I liked. Some of these were not 3D but the story line and themes to them were amusing. Some of the short animations from the DVD that I liked are:

Chris Hardling's animation about George learning self defence - This was not 3D but the story line and humour was very well portrayed.

A 3D MTV add - This one was in a very dark room with a high placed TV, the feeling from this was mysterious and kind of weird. But everything had a creapy design to it and looked in place.

Lego space animation - The idea of using "lego" style characters would be easy to recreate and construct as they are all the same style. Lego designs have been used in many ways for games such as Lego racing and the Lego star wars series, so there would be many ways to branch off that.

Comic book lego looking fight - This was a fast paced 3D animation, again using the simple lego style shapes for characters. The detail and flow from page to page was impressive. I am considering this as a possible style for my project.

3D Radio teddy bears - This comedy animation was designed around a English radio talk back show. The look of this seems to be a very casual radio environment with a couple of out-of-place fluffy looking teddy bears, who appear to be the hosts. They have no mouths so all the interaction between the 2 is through facial expression (raising eyebrows, face muscle movement etc). This was an interesting way to go about it. Doing it this way would mean less fiddling around with mouth movements. Mouth movements to a voice over would be hard to do because for each character speaking, the shape of the mouth has to match the sounds of the words spoken, other wise it just looks like a bad Aussie cleaning products add. I am also considering this approach for my project.

3D Robots in the realistic environment - This was very realistic. It would possibly require a lot more knowledge than what I will gain in a semester to understand how to implement. The robots have been drawn overtop of a video, and rendered to look like they are interacting with the other objects in the video. The robots have a sleek realistic look them, with added effects to allow surrounding objects to reflet onto them and shadows cast depending on where they are standing. Eventually, I would like to create this sort of 3D effects and creations, but for now it will be a little bit beyond my knowledge.

More research needs to be done to help develop ideas, styles and what I am going to create.

My very first animation...


Before you learn to walk, you have to learn to crawl. This is my approach to 3D animation. My first animation consisted of a basic NURBS sphere, not rendered any pretty colours or added effects, just a simple sphere which I animated using the time slider to "bounce" up and down.
The animation loops so when run, it looks like a ball continuosly bouncing up and down to the same height. It consists of 3 frames.
Frame one contains the sphere shape at the centre of the grid base.
Frame 2 is the same sphere but moved up vertically.
Finally, frame 3 is the sphere moved back down vertically to its original position but has been scaled to look squished (wider rather that perfect radius all around). This will give the illusion of a physical impact.
After running it for the first time, the ball looked like it was on speed! The key frames needed to be made further apart to make the balls size and weight appearance match its falling and bounce time.
I will look into how many frames per second maya defaults to and how to change it.